
On this page

Accessing My Timetable | Before you create your timetable | Status bar and Enrolment icons | How to read the subject code | Understanding Activity types | Understanding Sections  | Create your timetable | Step 1: Select an activity | Step 2: Select your class time | Viewing your timetable | Subscribe to your timetable | Subscribing on an iPAD/iPhone

Accessing My Timetable

Access the timetable through: 

Note: You can only access the timetable after you have completed your enrolment via My Student Admin. 

You can also follow the video below:

9a7jRBDnjtw

Transcript

Hello everyone. In this video, I will show you how to read, choose, and view your timetable at UTS.

This video assumes that you have already enrolled in your subjects for the upcoming sessions. To check this, you can visit the Current Enrolments section within the Subjects tab in your My Student Admin.

First, go to your My Timetable, then select the appropriate year. Log in with your student ID and password.

Once you are logged in, you will see the My Timetable home page, displaying all the subjects you are enrolled in for the upcoming calendar year. For example, you might see subjects for Autumn and Spring. Under each subject, you may see multiple activities, such as lectures, tutorials, sections, and seminars.

Many subjects will have a variety of types and numbers of activities listed. You need to make sure you have a time allocated under each of these activities.

If you have a subject that includes sections, you will need to decide on a section, then choose one option for every type of class listed under that section. A subject coordinator may implement sections for reasons such as ensuring the same students are on campus on the same day to help with group work.

In this example, if you choose section 1, denoted by SC01, you will not be able to select any of the times shown under section 2.

Your My Timetable can show a lot of information, so it's best to get a good idea of what everything means. First, let's take a look at the status bar just underneath your name. The status bar gives a quick breakdown of all the activities you have allocated, and how many you still have remaining. You should aim for the 'Not allocated' section to be zero.

Now, let's look at one of these subjects. Above the name of the subject, you will see a code that provides helpful information about the subject you are choosing a timetable for. The first five digits in this code show a unique code for that subject. Next to that, you will see SPR, which signifies you are enrolled in the subject for the Spring session. This can also show AUT for Autumn, or SUM for Summer. After this, you will see the letter U. This signifies the campus where the subject is taking place. Here, you might see U for Ultimo, or MP for Moore Park. At the end, you will see the letter S. This signifies the subject's study mode. In this case, S means standard mode, which usually runs for the full length of the session. You may also see D for distance or online subjects, or B for block mode subjects, which are often run in shorter, more intensive study periods.

Now, let's take a look at choosing a time for the tutorial for the subject Managing People and Organisations. Once you have selected the tutorial, on the right you will see all the available times this class runs. It will show the activity number, day, time, campus, location during session, duration, weeks the class is running, and any additional notes.

In this example, there are a number of times available for the tutorial. You may choose from any that show 'Select'. In some scenarios, you may automatically be allocated to a time, usually if there is only one activity available.

Let's choose the first available time. In addition to the message 'Select', you may also see 'Full', indicating the activity has reached capacity, or 'Clash', which means the activity is running at the same time as one of your other allocated activities.

If there is a class time that is full but you would prefer to select that time, you can use the Favourite function to be placed in the activity if any spaces become available. You can also select the bin icon to deallocate from your chosen class time without having to select another.

Additionally, if you wish to find out the class times for certain subjects, or the sessions in which those subjects are offered, you can use the search bar function to find information about subjects.

In My Timetable, you can also view your timetable allocations in a calendar view. To do this, click on the Timetable button in the top right. This will show all your allocated activities in a weekly breakdown. You can use the Filter Classes button to show classes for a given session, or use the arrow buttons to jump through your calendar on a week-by-week basis.

By repeating the steps in this tutorial, you should be able to choose times for all your classes for the upcoming session. You can also use this section to add your UTS timetable to your personal calendar.

For more information, please visit the My Timetable Help Guide on the UTS website or contact the UTS Student Centre.

Before you create your timetable

Status bar and Enrolment icons

The status bar at the top provides a quick indication of your selected classes. Your class selection is complete when all subjects are ‘Allocated’ and you have no ‘Pending’ or ‘Not Allocated’ items in the status bar. 
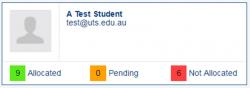
My Timetable status bar

Icons in the ‘Enrolment’ section will let you know which subjects you have already selected/not selected classes.

icondescription
TickClass selection is complete
Exclamation markClass selection is incomplete
informationLinks to subject page of UTS Handbook

How to read the subject code

sau-timetable-reading-codes

For help with the subject code terms, please refer to the timetable terms page.

Understanding Activity types

Activities appear on the left side under the subject code. Activities are named by the teaching method which the class is delivered. 

Different subjects may have different activity types. There are currently 12 activity types and these will be displayed as different colours on your personal timetable after you have selected your classes.

Colourcodeactivity type
BCPBootcamp
colour blockBrkBreakout
colour blockCNRClass not required
colour blockCmpComputer lab
colour blockDrpDrop in
Blue colour to represent introductory activityIntIntroductory activity
colour blockLabLaboratory
colour blockLecLecture
Blue colour to represent introductory activityOlr*Online Live Recorded Activity
colour blockPrcPractical
Blue colour to represent introductory activityRec**Recorded Activity
colour blockSem Seminar
colour blockStuStudio
colour blockTutTutorial
colour blockUPSUPASS
colour blockWrkWorkshop

*For live, online activities that will also be recorded and available for students to access online when available. Usually used for Lectures. Clashable activity - you can allocate to other activities scheduled on the same day/time if you opt to access the recorded activity.

**For pre-recorded activities ONLY, i.e. activities that are offered as a recording for students to access online when available or on-demand. Usually used for Lectures. Attendance is not required at scheduled times. Clashable activity - you can allocate to other activities scheduled on the same day/time.

 Understanding Sections

A section is a group of activities.  For classes that are in a section, you can only select activities in the same grid.

Create your timetable

Step 1: Select an activity

Your subjects will appear in the ‘Enrolment’ section.  Under each subject is an activity (with an orange triangle next to it). View available class times by clicking on that subject's activity. 
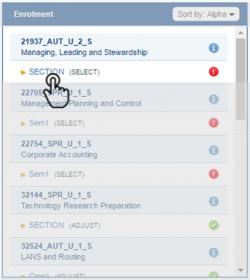
Enrolment subjects list

Step 2: Select your class time

The coloured buttons will show you the class activities available for selection and which class you have already selected.

ButtonDescription
SelectYou can select this class
This class is available for you to select or change your time.
AllocatedYou have selected this class
This is the class you have chosen to attend. This class will appear in your timetable.
FullYou cannot select this class
This class is full. 
ClashYou cannot select this class
The time clashes with another activity you have selected. Click the button to view the clash.

Viewing your timetable

After you have selected all your classes, you can view your personal timetable by clicking on ‘Timetable’ from the menu bar. The current week will be loaded initially, you can drag the slider at the top to view other weeks.
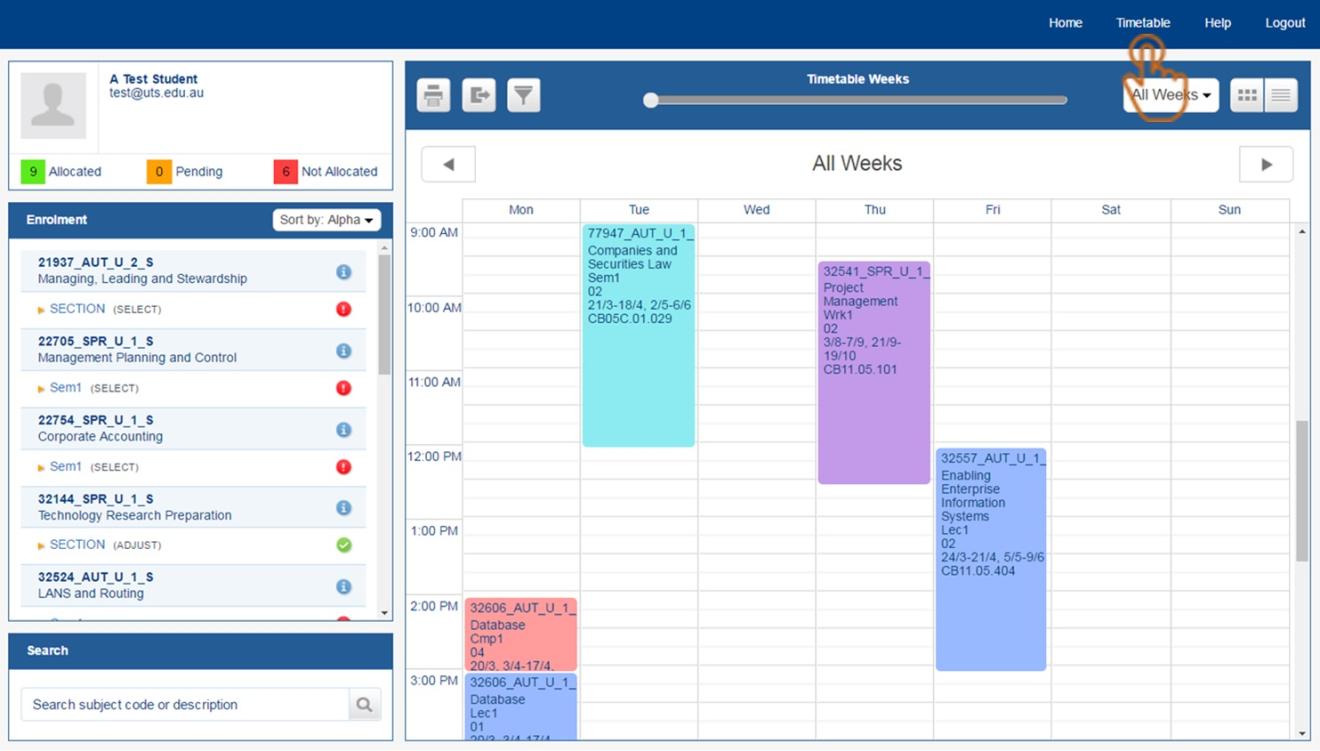
My timetable view

Locating your class: 
Understand the UTS Location Key Code to find out what 04.03.005 means.

Subscribe to your timetable

You can sync your timetable to a compatible calendar app (i.e. google calendar) on your phone. Download the iCalendar file from the homepage (at the bottom) after logging in.
Your timetable as an icalendar feed

Subscribing on an iPAD/iPhone

To subscribe to this iCalendar on an iPhone or iPad, please use the following steps:

  1. Don't tap, but Hold the link so you get a list of options and "Copy".
  2. Launch the Settings app on your iPhone or iPad.
  3. Tap on Mail, Contacts, Calendars.
  4. Tap on Add Account.
  5. Tap on Other.
  6. Tap on Add Subscribed Calendar under the Other section.
  7. "Paste" in the server location of the calendar from step 1.